Saturday, December 31, 2016

Raspberry Pi Experiments - Setting Samba Network File Sharing


First of all Happy New Year to all. In this new post I will be focusing on how to convert  Raspberry Pi to a network file server.

For this I used the instructions from http://raspberrywebserver.com/serveradmin/share-your-raspberry-pis-files-and-folders-across-a-network.html and I am happy it worked.

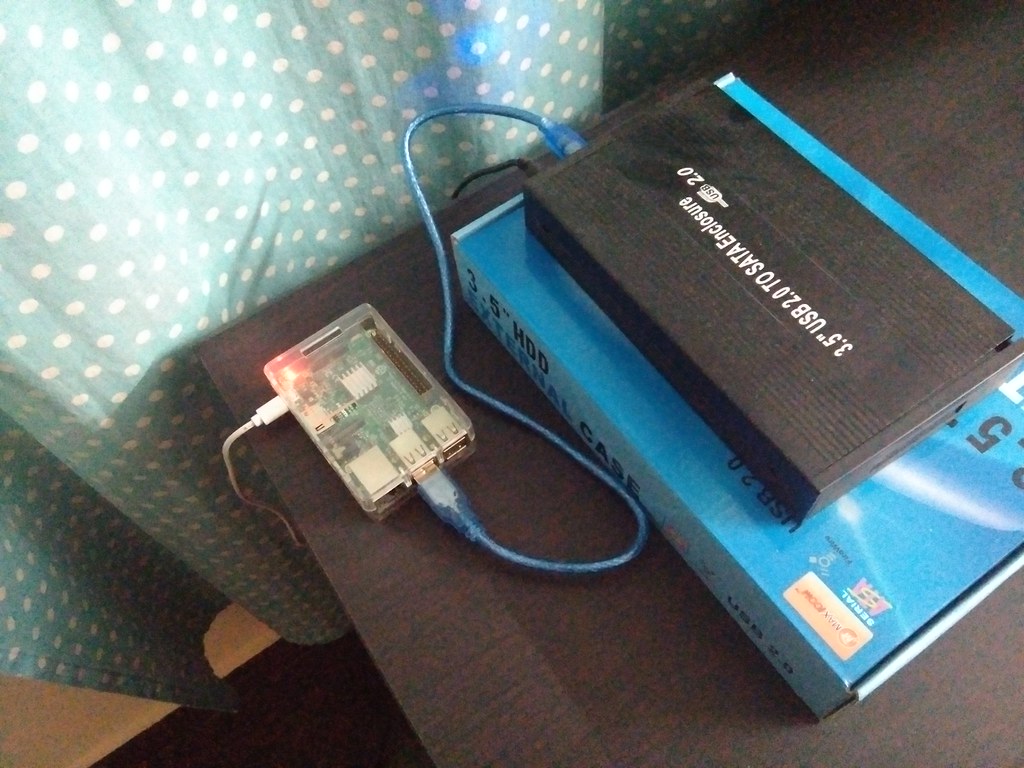
In my previous post http://priyabgeek.blogspot.in/2016/12/raspberry-pi-experiments-file-server.html I had talked about attaching my Hard disk to raspberry pi and accessing files via a web server. While discussing this over Facebook I got a comment to use samba as a file server. Though I knew about it but was not sure how easy it is to set up.

So here are the steps I followed to setup samba in my Raspberry Pi 3.
1. Download the samba binaries
sudo apt-get install samba samba-common-bin
 In case you face issues please type sudo apt-get update and do the above step again for the installation to take place.

2. Take backup of /etc/samba/smb.conf
sudo cp /etc/samba/smb.conf /etc/samba/smb.conf.bkp
3. Edit /etc/samba/smb.conf to make the necessary changes for network sharing
sudo vi /etc/samba/smb.conf
4. Please find the below options and make the necessary changes:

# Change this to the workgroup/NT-domain name your Samba server will part of
   workgroup = WORKGROUP

# Windows Internet Name Serving Support Section:
# WINS Support - Tells the NMBD component of Samba to enable its WINS Server
#   wins support = no

   wins support = yes
5. Also add the path that you want to share. In my case I wanted to share my mounted External hard drive. I added this part to the end of the file /etc/samba/smb.conf
[filedrive]
   comment= FileDrive
   path=/mnt/usbdrive
   browseable=Yes
   writeable=Yes
   only guest=no
   create mask=0777
   directory mask=0777
   public=no
 6. Mounting the hard disk
sudo mount /dev/sda1 /mnt/usbdrive/

7. Set up a samba password for pi user
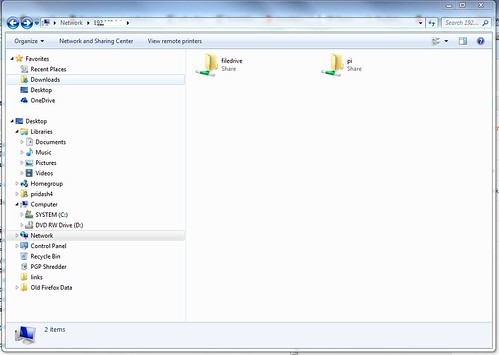
sudo smbpasswd -a pi 
 8. Finally access the samba server from windows.

SambaServer 

Hope this short post is helpful to you  as it was to me.

Monday, December 26, 2016

Raspberry Pi Experiments - File Server using Hard Drive


IMG_20161226_230403


For long I wanted to host a cloud file server for my needs. As my file collection was growing bulky and taking a lot of space on my laptop and on my wife's hard disk. It was absolutely necessary that I would have to buy a external hard disk. There were two features that I wanted in my cloud file server solution.
1. To be hosted from my home
2. To be accessible from any place

For point 2 I restored to opening a ssh tunnel from home Raspberry Pi to my AWS instance. For more details check my blog http://priyabgeek.blogspot.in/2016/08/raspberry-pi-experiment-ssh-reverse.html

Having read about the how a hard disk can be connected to Raspberry pi and can be mounted like in any other linux system I got a Seagate 2 TB SATA Barracuda 3.5" internal Desktop Hard Disk - ST2000DM006 from eBay and got a local 3.5 Inch USB 2 Hard disk case. The important thing here is that I used a Hard disk case with external power supply as this is important because the Hard disk can not work by taking current from Raspberry Pi via USB. And with Barracuda hard disk I also got an external fan which really made it a great deal as now I do not have to worry of cooling the hard disk. Now the tricky part was the USB connector. The case did not have one but the compatible USB cable that comes with Arduino UNO did work well and after connecting did not have any issues.

Now coming to the commands that I used to setup the file system.

First check if hard disk is detected
pi@raspberrypi:~ $ lsusb
Bus 001 Device 004: ID 152d:2329 JMicron Technology Corp. / JMicron USA Technology Corp. JM20329 SATA Bridge
Bus 001 Device 003: ID 0424:ec00 Standard Microsystems Corp. SMSC9512/9514 Fast Ethernet Adapter
Bus 001 Device 002: ID 0424:9514 Standard Microsystems Corp.
Bus 001 Device 001: ID 1d6b:0002 Linux Foundation 2.0 root hub


If you detect a SATA Bridge driver it means your disk is detected.


Though there are known issues with NTFS on Raspberry PI and Raspbian I chose the file system because of the sheer portability and support I can get out of NTFS as a network files system which I did not expect out of a fat32 file system because of its formatting issues and its max 2gb limit for the file size. The issue with ext4 or similar linux file formats is that they are not supported natively on Mac or Windows. Hence I went ahead with NTFS as the file system for my external hard disk.

List your file systems:
sudo fdisk -l 
Device     Boot Start        End    Sectors  Size Id Type
/dev/sda1        2048 3907029167 3907027120  1.8T 83 Linux


Before formatting unmount the USB drive to be safe:


sudo umount /dev/sda1
For more clarity on the disk used and partition details I use test disk which can be installed as given below:


sudo apt-get update
sudo apt-get install testdisk
Launch testdisk command as given in the below screencast:


sudo testdisk


Now we need to install the ntfs drivers:

sudo apt-get install ntfs-3g

After installing it we can format the hard disk as below

sudo mkfs.ntfs /dev/sda1 -f -v -I -L disk-name 

We can check the disk details using the command:

pi@raspberrypi:~ $ sudo blkid
/dev/mmcblk0p1: SEC_TYPE="msdos" LABEL="boot" UUID="22E0-C711" TYPE="vfat" PARTUUID="4bad8776-01"
/dev/mmcblk0p2: UUID="202638e1-4ce4-45df-9a00-ad725c2537bb" TYPE="ext4" PARTUUID="4bad8776-02"
/dev/sda1: LABEL="segate-dash" UUID="0EEB5BXXXXXXXX" TYPE="ntfs"
/dev/mmcblk0: PTUUID="4bad8776" PTTYPE="dos"

Next activity was to setup the file server. For this I needed very basic HTTP Server of showing the list of files and a basic service of uploading some files. And to expose this server via ssh tunnel I used the instructions given in http://priyabgeek.blogspot.in/2016/08/raspberry-pi-experiment-ssh-reverse.html

For the file server I used one of my projects https://github.com/bobquest33/gofileserver. You can download it using git and install the golang from the binaries at https://golang.org/dl/ and download the latest ARM version of go binaries. As the scope of how to install go and compile the above project is out of scope of this blog I will cover it in a different post or leave you to explore it for your self. Finally what you get is a file server. Now its not mandatory that you use my approach you can also use your own approach as well.

What I did however was to first mount the formatted hard disk to the below path:

sudo mkdir /mnt/usbdrive
sudo mount /dev/sda1 /mnt/usbdrive
ls /mnt/usbdrive
Then pointed the gofileserver to the given path /mnt/usbdrive and added it to crontab:
@reboot nohup sudo /home/pi/code/gofileserver/gofileserver :8001 /mnt/usbdrive & 
Now this setup is subjective and you can do a better job but this is what I felt as the best option given the circumstances.

And finally I was able to see the files:

Screen Shot 2016-12-26 at 11.53.33 PM

Now for most of the cases it works fine and I am also having a interface where I can upload the files but that is still work in progress and I am trying to fix. But at the end what matters most is that where ever I am I am getting a read only version of my file which is great. Now the only thing I want to do next it to add https support and more user friendly UI which I will take as my future project.

Coming to the issues, one of the biggest issues which I faced was if I try to use a file upload program like scp or html multi-part file upload the file upload is fast but the server hangs. Also some times the server goes offline. Now I do not know if this is because of the NTFS driver or some other reason. But as a start now I can access my files from anywhere and use it.

If you have any better suggestions of feedback please do comment below.

Tuesday, December 13, 2016

Hadoop experience


I get call from many recruiters where they ask for 4-7 years experience in Hadoop for a technology that just started in 2010 and just picked in 2014 how can people demand such high experience and that to for the role of a developer.

It is in this context I strongly feel that recruiters should also do some background work for a role and skills needed before blindly cold calling people for roles. Even if they ask someone that will also help. Many recruiters have called me and some even ask about what's the expected experience and I do help. The companies and the recruiters should be realistic about the skills and experience that is required should be prepared for skill enhancement and training.

Unlike other skills big data skills are ever changing and need constant update and the technologies are irrelevant in months not even years hence realistic and a new approach to big data hiring is needed with focus on aptitude and skill development than throwing cash.

Tuesday, October 18, 2016

Raspberry Pi Experiments - Taking my Gmail Backup

An existential issue for me had been the issue of taking backup of my Gmail with size of 11 GB.
I tried many things but nothing guaranteed seamless backup when I was away doing something else. I tried with my Laptop but despite taking the backup worth days after days I had to do it taking breaks as I also needed to use my laptop for other things.

So it was a good test to see if I can take backup of my emails using my Raspberry Pi 3. The good thing is that its support for python and I also got a supporting project on github with which I am able to take backup of my Gmail using just python and no extra libraries.

Github link:
https://github.com/RaymiiOrg/NoPriv

I just cloned the git into my Raspberry Pi, made the necessary changes to setup the email account details in nopriv.ini.

For Gmail before using the script please make sure you make the below setup:

1. Setup the IMAP Access
https://mail.google.com/mail/u/0/#settings/fwdandpop


UntitledGmail

2. If two factor authentication is enabled setup App password for Gmail details given in the below link:
https://support.google.com/accounts/answer/185833. In nopriv.ini you need to provide the app password instead of you gmail/google password.

Once this setup is done you can run nopriv.py as below:
python nopriv.py  

If you want to run in background you can run as below:

 nohup python nopriv.py &

The rundown of the steps is given below in the screencast:


Hope this post was helpful.

Thursday, September 1, 2016

Raspberry Pi with Arduino Uno and Golang


Background


I just bought an Arduino Uno to continue my IOT experiments and one of the first experiments that I wanted to carry out was to check how I can setup Arduino Uno with my Raspberry PI 3 mod b model and make it work.

It must be understood that what I am going to explain now involves a bit of hack and hence should be done with utmost care as it may change your Raspberry pi settings specifically with that of inbuilt Bluetooth.

I wanted to try and see how we can program Arduino with Raspberry Pi without Arduino IDE. Turns out we can do it using serial port and though we can do Arduino programming and serial port programming using python for this particular instance I chose Golang. I wanted particularly to explore the gobot framework which is suited for robotics and Arduino programming.

 Serial Port Raspberry PI 3

Now usually Arduino can be accessed in Raspberry Pi3 via serial port. It communicates with the RasPi via GPIO 14/15 which on the Model B,B+ and Pi2 is mapped to UART0. However on the Pi3 these pins are mapped to UART1 since UART0 is now used for the Bluetooth module. However UART1 is software UART and baud rate is dependent to clock speed which can change with the CPU load, under voltage and temperature; therefore not stable enough. One hack is to force the CPU to a lower speed ( add core_freq=250 to /boot/cmdline.txt)which cripples the Pi3 performance.

A better solution is to disable BT and map UART1 back to UART0 (ttyAMA0) so we can talk to Arduino in the same way as before.

Step 1:  Update the system with:

sudo apt-get update
sudo apt-get upgrade

Step 2:  Device Tree settings as below:

Add device tree to /boot/config.txt to disable the Raspberry Pi 3 bluetooth.

sudo nano /boot/config.txt

Add at the end of the file

dtoverlay=pi3-miniuart-bt

Exit the editor saving your changes and then:

sudo reboot

Note: 

For Raspbian Jessie releases after 18th March 2016

There is now a device tree file called pi3-miniuart-bt which makes the Raspberry Pi 3 disable the Bluetooth and map pl011 UART on pins 14 and 15 as before.

Enabling the Serial Console Rasbian Jessie after 18th March 2016 release

To enable the serial console, you need to edit the /boot/cmdline.txt file

sudo nano /boot/cmdline.txt
Change the file to the following:

dwc_otg.lpm_enable=0 console=tty1 console=serial0,115200 root=/dev/mmcblk0p2 rootfstype=ext4 elevator=deadline fsck.repair=yes root wait

Exit and save your changes

With the serial console enabled you should now have the boot commands and login prompt when connected at 115200 baud.

Setting up Arduino with Raspberry Pi 3

Install Gort

The Gort CLI provides many useful features on many hardware platforms, and has no other dependencies. It can be installed by downloading the archive for Gort from http://gort.io and copying gort binary to /usr/bin in Raspberry Pi. Point to note is that you need to download the archive file for ARM linux (e.g.  gort_0.x.x_linux_arm.tar.gz)

Setup Arduino Firmware

First plug the Arduino into your computer via the USB/serial port.

Once plugged in, use Gort's gort scan serial command to find out your connection info and serial port address:

$ gort scan serial
Use the gort arduino install command to install avrdude, this will allow you to upload firmata to the arduino:

$ gort arduino install
Once the avrdude uploader is installed we upload the firmata protocol to the arduino, use the arduino serial port address found when you ran gort scan serial, or leave it blank to use the default address ttyACM0:

$ gort arduino upload firmata /dev/ttyACM0
Now you are ready to connect and communicate with the Arduino using serial port connection

(Reference: https://gobot.io/documentation/platforms/arduino/)

Running a robot program in Arduino

The below packages for Arduino platform provide the adaptor for microcontrollers such as Arduino that support the Firmata protocol. The sample program to run is given below:

// testarduino.goimport (
        "time"
        "github.com/hybridgroup/gobot"
        "github.com/hybridgroup/gobot/platforms/firmata"
        "github.com/hybridgroup/gobot/platforms/gpio"
)
func main() {
        gbot := gobot.NewGobot()
        firmataAdaptor := firmata.NewFirmataAdaptor("arduino", "/dev/ttyACM0")
        led := gpio.NewLedDriver(firmataAdaptor, "led", "13")
        work := func() {
                gobot.Every(1*time.Second, func() {
                        led.Toggle()
                })
        }
        robot := gobot.NewRobot("bot",
                []gobot.Connection{firmataAdaptor},
                []gobot.Device{led},
                work,
        )
        gbot.AddRobot(robot)
        gbot.Start()
}

To run the program:
1. Place the above code as "testarduino.go" into a folder e.g

pi@raspberrypi:~/code/golang $ ls testfermata_arduinopi/
testarduino.go

Setup the GOPATH, then run the below commands.
export GOPATH=`pwd`
Setup gobot framework
go get -d -u github.com/hybridgroup/gobot/... && go install github.com/hybridgroup/gobot/platforms/firmata 
Run the go program:
go run testarduino.go

The following terminal cast shows the above step


The output can be watched in the following video where an led on Arduino is blinking


VID_20160831_024550

Monday, August 29, 2016

I am an apple mac lover who also loves linux

Few days back I heard about an advertisement where Microsoft is trolling Apple Macbook in favour its surface laptop series. But what ever one may say Microsoft doing such troll on Apple seems to be ironic which has mastered the blocky desktop and laptop design and which has mastered the art of shabby UI design and is more a reminder to me of a compulsion to use as an OS for office work.

Microsoft windows was the first OS that I was introduced to as a kid but it was linux that took my heart. Linux has far more cleaner UI design than windows and given that the option of so many UI skins and managers  that for a better part of my student and work life my primary OS was linux. At one point while using Windows XP my laptop was so much infested with worms, trojans and viruses I was forced to abandon it in favour of Linux. I know Windows is the de-facto OS that many people use and today the scenario has changed when mobile phones and Tabs are blurring the difference between laptops and handheld devices still linux reigns supreme with the Android being the OS of choice.

But coming to Mac, from the first time I saw an iMac desktop in a Bollywood movie I was intreguied to find more about Apple Macs, then came MacBooks and then Macbook Air. Looking at these beauties seemed like a work of art. They imbibed within them the beauty of heavenly maidens and with focus on solid build quality, superior finish and the focus on fluidic design with the focus on software and hardware having unisonic flow had always had me wanting to use a Mac and when I got a chance I never missed the opportunity.  I will not say that I liked everything about Macbook but then being the tinkerer on linux I always found the workaround. And lately I have discovered that Macbook is a far supirior platform for designers and software developers alike that I am just trying my best to move to Mac as my primary work platform. All in all yes Surface tab/laptop is catching up but my love for Mac and even for linux is never going to diminish.


Raspberry pi experiment - ssh reverse tunnel with a public server

Background

I wanted to access my Raspberry Pi from anywhere possible but had issue with how to do it without setting up a static IP or tinkering the ISP routing table. While exploring for the solution I can across SSH reverse proxy. This blog post explores my experiences with setting it up a reverse proxy from Raspberry PI to a AWS server through which I can access using a public AWS IP address.

What is ssh reverse tunnel?


The above image will give a fair bit of idea as to what is Reverse SSH tunnel and what I am trying to achieve. SSH is very good tool to access remote machine or server securely. But, the problem arises when you try to connect to a remote server which is behind a firewall/nat and this firewall/nat denies any incoming connection or data transfer request that has no prior outgoing request. This means that only those connections would be allowed which are initiated by the remote server machine. This is a real problem for those who want to access this server machine remotely.

Reverse SSH provides a technique through which you can simulate a normal SSH to this remote server machine.

The main problem is that firewall is rejecting ssh connection that your machine is trying to establish with remote server machine. But you know that the same firewall will not have any problem with the connections originating from server machine. So, why not ask some one who is sitting behind the firewall to do something with which you can achieve your goal of remotely accessing the server. To do this we have to use ssh -R option.

Let's assume that Destination's IP is 192.168.20.55 (Linux box that you want to access).
You want to access from Linux client with IP 138.47.99.99.
Destination (192.168.20.55) <- |NAT| <- Source (138.47.99.99)
1. SSH from the destination to the source (with public ip) using command below:
ssh -R 19999:localhost:22 sourceuser@138.47.99.99
* port 19999 can be any unused port.
2. Now you can SSH from source to destination through SSH tuneling:
ssh localhost -p 19999
3. 3rd party servers can also access 192.168.20.55 through Destination (138.47.99.99).
Destination (192.168.20.55) <- |NAT| <- Source (138.47.99.99) <- Bob's server
3.1 From Bob's server:
ssh sourceuser@138.47.99.99
3.2 After the sucessful login to Source:
ssh localhost -p 19999
* the connection between destination and source must be alive at all time.
Tip: you may run a command (e.g. watch, top) on Destination to keep the connection active.
At this juncture I came to a problem where when ever I was doing a remote tunnel to my aws server via ssh command it was also opening a session which I did not want. I basically wanted a service to run in background. I also installed auto ssh but there also I faced issues. Hence I rolled my own solution for running a reverse proxy tunnel which I will be covering below.

Rtunnel - Reverse proxy service for Raspberry pi


The basis of this script is paramiko python library which is the leading native sshv2 python library. I used the code from rforward.py as the basis for my python script rtunnel.py . And made some changes to extract the logs of rtunnel service to /tmp/rtunnel.log. Which can as a stand alone script in itself.

Additionally I have created a script rtunnel.sh which helps to convert rtunnel.py as a Raspberry pi init.d service.

Installation

First install the below packages:

sudo apt-get install build-essential libssl-dev libffi-dev python-dev

The easiest way to install is to clone the repo from github to raspberry pi
git clone https://github.com/bobquest33/rtunnel_devel.git
cd  rtunnel_devel
pip install -r requirement.txt
Test if rtunnel.py works
 python rtunnel.py -u ubuntu -K Priyabratadash1.pem -p 8001 -r 127.0.0.1:8001 e2host.compute.amazonaws.com

Some of the options for the rtunnel.py is given below which you can find in rtunnel.log when you run python rtunnel.py -h:
  --version             show program's version number and exit
  -h, --help            show this help message and exit
  -q, --quiet           squelch all informational output
  -p PORT, --remote-port=PORT
                        port on server to forward (default: 4000)
  -u USER, --user=USER  username for SSH authentication (default: pridash4)
  -K KEYFILE, --key=KEYFILE
                        private key file to use for SSH authentication
  --no-key              don't look for or use a private key file
  -P, --password        read password (for key or password auth) from stdin
  -r host:port, --remote=host:port
                        remote host and port to forward to
Copy rtunnel_devel folder to /usr/local/bin:
sudo cp -r rtunnel_devel /usr/local/bin/rtunnel


Setting Rtunnel Service:

The following init script makes getting a Python script (or e.g. a Perl script) to run when the Raspberry Pi boots fairly painless. Services are supposed to run as “daemons” which is quite complicated in Python and involves forking the process twice and other nasty bits. 
Instead we can make use of the handy start-stop-daemon command to run our script in the background and basically deals with everything we need.

While setting the script rtunnel.sh please make the following changes to reflect the correct options of rtunnel.py


SSH_USER=ubuntu
KEY_FILE=$DIR/Priyabrata1.pem
SSH_SERVER=ec2host.compute.amazonaws.com
REMOTE_FWD_HOST=127.0.0.1:8001
LOCAL_PORT=8001


The code for rtunnel.sh is give below. For latest version please refer to the github link:
#!/bin/sh
### BEGIN INIT INFO
# Provides: rtunnel
# Required-Start: $remote_fs $syslog
# Required-Stop: $remote_fs $syslog
# Default-Start: 2 3 4 5
# Default-Stop: 0 1 6
# Short-Description: This service helps to access a local port from a remote server & port
# Description: This service helps to access a remote port from a remote server & port
### END INIT INFO
# Change the next 3 lines to suit where you install your script and what you want to call it
DIR=/usr/local/bin/rtunnel
DAEMON=$DIR/rtunnel.py
DAEMON_NAME=rtunnel
SSH_USER=ubuntu
KEY_FILE=$DIR/Priyabrata1.pem
SSH_SERVER=<ec2_host>.compute.amazonaws.com
REMOTE_FWD_HOST=127.0.0.1:8001
LOCAL_PORT=8001
# Add any command line options for your daemon here
DAEMON_OPTS="-u $SSH_USER -K $KEY_FILE -p $LOCAL_PORT -r $REMOTE_FWD_HOST $SSH_SERVER"
# This next line determines what user the script runs as.
# Root generally not recommended but necessary if you are using the Raspberry Pi GPIO from Python.
DAEMON_USER=root
# The process ID of the script when it runs is stored here:
PIDFILE=/var/run/$DAEMON_NAME.pid
. /lib/lsb/init-functions
do_start () {
log_daemon_msg "Starting system $DAEMON_NAME daemon"
start-stop-daemon --start --background --pidfile $PIDFILE --make-pidfile --user $DAEMON_USER\
--chuid $DAEMON_USER --startas $DAEMON -- $DAEMON_OPTS
log_end_msg $?
}
do_stop () {
log_daemon_msg "Stopping system $DAEMON_NAME daemon"
start-stop-daemon --stop --pidfile $PIDFILE --retry 10
log_end_msg $?
}
case "$1" in
start|stop)
do_${1}
;;
restart|reload|force-reload)
do_stop
do_start
;;
status)
status_of_proc "$DAEMON_NAME" "$DAEMON" && exit 0 || exit $?
;;
*)
echo "Usage: /etc/init.d/$DAEMON_NAME {start|stop|restart|status}"
exit 1
;;
esac
exit 0


Using the init script


To actually use this script, put your Python script where you want and make sure it is executable (e.g. chmod 755 rtunnel.py) and also starts with the line that tells the computer to use the Python interpreter (e.g. #!/usr/bin/env python). Edit the init script accordingly. Copy the init script into /etc/init.d using e.g. sudo cp rtunnel.sh /etc/init.d. Make sure the script is executable (chmod again) and make sure that it has UNIX line-endings (dos2unix).
To make the Raspberry Pi use your init script at the right time, one more step is required: running the command sudo update-rc.d rtunnel.sh defaults. This command adds in symbolic links to the /etc/rc?.d directories so that the init script is run at the default times. you can see these links if you do ls -l /etc/rc?.d/*rtunnel.sh

At this point you should be able to start your Python script using the command sudo /etc/init.d/rtunnel.sh start, check its status with the /etc/init.d/rtunnel.sh status argument and stop it with sudo /etc/init.d/rtunnel.sh stop.

Troubleshooting

There are a lot of things to get right here. Here are some things to check (with thanks to David Selinger):
  1. Make sure your Python file can execute stand-alone. Make sure you can run the command sudo /usr/local/bin/rtunnel/rtunnel.py(or whatever you have called it). If that doesn’t work then check it is executable (with ls -l) and check it does not assume it is launched from a specific directory.
  2. Try the start-stop-daemon command outside of the init script. You should be able to do sudo start-stop-daemon ... with all the parameters filled in.
  3. Try writing a simple init script alternative that strips out most of the configuration and hard-codes the variables such as $DIR etc to make sure you have got that part right.
  4. Test the complete init script by hand using sudo /etc/init.d/rtunnel start (though note that you must have done the update-rc.dcommand before this).
  5. Test if it works when rebooting. If not, then you have a problem with the update-rc.d part and the /etc/rc?.d links.

Checking if the tunnel is up

In my case I was running a file server on my raspberry pi at port 8001, now to check if the public link is up I developed the above script 

#!/bin/sh #checkURL.sh
yourURL="http://<ec2_host>.compute.amazonaws.com:8001"
if curl --output /dev/null --silent --head --fail "$yourURL"
then
echo "This URL Exist"
else
echo "This URL Not Exist"
sudo service rtunnel.sh restart
fi

Finally I added a crontab entry like below to check the link every 15 mins:
*/15 * * * * sh /home/pi/bin/checkURL.sh 2>&1

Screenshots of my experiment below:

From my raspberry pi at home:


From my aws server:


Raspberry Pi Experiments: Running Python3 , Jupyter Notebooks and Dask Cluster - Part 2

Its been a while since I posted my last post but had planned for this a while back and completely missed it. In this part of the blog I wil...