
Background
I just bought an Arduino Uno to continue my IOT experiments and one of the first experiments that I wanted to carry out was to check how I can setup Arduino Uno with my Raspberry PI 3 mod b model and make it work.
It must be understood that what I am going to explain now involves a bit of hack and hence should be done with utmost care as it may change your Raspberry pi settings specifically with that of inbuilt Bluetooth.
I wanted to try and see how we can program Arduino with Raspberry Pi without Arduino IDE. Turns out we can do it using serial port and though we can do Arduino programming and serial port programming using python for this particular instance I chose Golang. I wanted particularly to explore the gobot framework which is suited for robotics and Arduino programming.
Serial Port Raspberry PI 3
Now usually Arduino can be accessed in Raspberry Pi3 via serial port. It communicates with the RasPi via GPIO 14/15 which on the Model B,B+ and Pi2 is mapped to UART0. However on the Pi3 these pins are mapped to UART1 since UART0 is now used for the Bluetooth module. However UART1 is software UART and baud rate is dependent to clock speed which can change with the CPU load, under voltage and temperature; therefore not stable enough. One hack is to force the CPU to a lower speed ( add core_freq=250 to /boot/cmdline.txt)which cripples the Pi3 performance.
A better solution is to disable BT and map UART1 back to UART0 (ttyAMA0) so we can talk to Arduino in the same way as before.
Step 1: Update the system with:
sudo apt-get update
sudo apt-get upgrade
Step 2: Device Tree settings as below:
Add device tree to /boot/config.txt to disable the Raspberry Pi 3 bluetooth.
sudo nano /boot/config.txt
Add at the end of the file
dtoverlay=pi3-miniuart-bt
Exit the editor saving your changes and then:
sudo reboot
Note:
For Raspbian Jessie releases after 18th March 2016
There is now a device tree file called pi3-miniuart-bt which makes the Raspberry Pi 3 disable the Bluetooth and map pl011 UART on pins 14 and 15 as before.
Enabling the Serial Console Rasbian Jessie after 18th March 2016 release
To enable the serial console, you need to edit the /boot/cmdline.txt file
sudo nano /boot/cmdline.txt
Change the file to the following:
dwc_otg.lpm_enable=0 console=tty1 console=serial0,115200 root=/dev/mmcblk0p2 rootfstype=ext4 elevator=deadline fsck.repair=yes root wait
Exit and save your changes
With the serial console enabled you should now have the boot commands and login prompt when connected at 115200 baud.
Setting up Arduino with Raspberry Pi 3
Install Gort
The Gort CLI provides many useful features on many hardware platforms, and has no other dependencies. It can be installed by downloading the archive for Gort from http://gort.io and copying gort binary to /usr/bin in Raspberry Pi. Point to note is that you need to download the archive file for ARM linux (e.g. gort_0.x.x_linux_arm.tar.gz)
Setup Arduino Firmware
First plug the Arduino into your computer via the USB/serial port.
Once plugged in, use Gort's gort scan serial command to find out your connection info and serial port address:
(Reference: https://gobot.io/documentation/platforms/arduino/)
Running a robot program in Arduino
The below packages for Arduino platform provide the adaptor for microcontrollers such as Arduino that support the Firmata protocol. The sample program to run is given below:
To run the program:
1. Place the above code as "testarduino.go" into a folder e.g
Setup the GOPATH, then run the below commands.
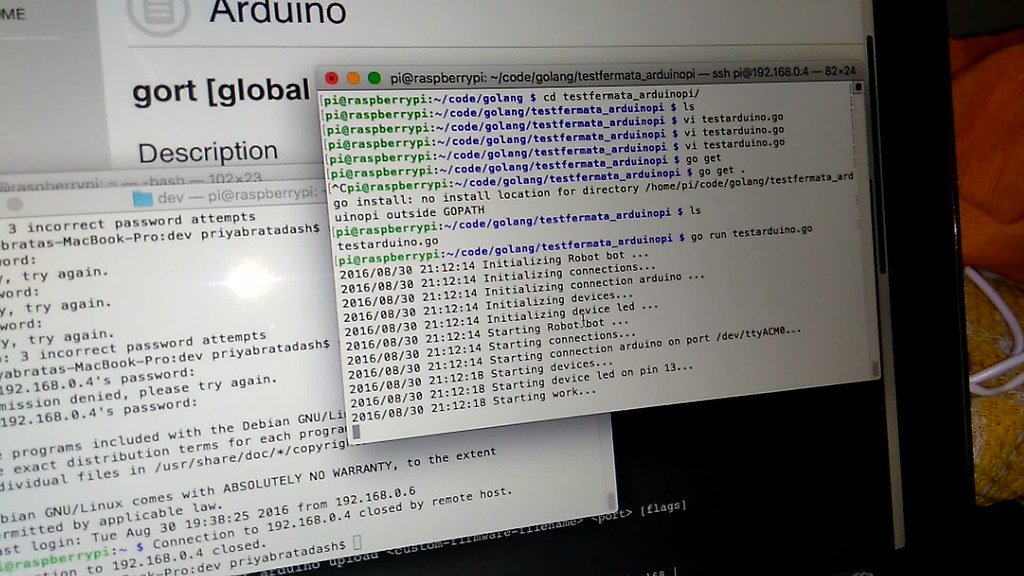
The following terminal cast shows the above step

The output can be watched in the following video where an led on Arduino is blinking
The Gort CLI provides many useful features on many hardware platforms, and has no other dependencies. It can be installed by downloading the archive for Gort from http://gort.io and copying gort binary to /usr/bin in Raspberry Pi. Point to note is that you need to download the archive file for ARM linux (e.g. gort_0.x.x_linux_arm.tar.gz)
First plug the Arduino into your computer via the USB/serial port.
Once plugged in, use Gort's gort scan serial command to find out your connection info and serial port address:
$ gort scan serialUse the gort arduino install command to install avrdude, this will allow you to upload firmata to the arduino:
$ gort arduino installOnce the avrdude uploader is installed we upload the firmata protocol to the arduino, use the arduino serial port address found when you ran gort scan serial, or leave it blank to use the default address ttyACM0:
$ gort arduino upload firmata /dev/ttyACM0Now you are ready to connect and communicate with the Arduino using serial port connection
(Reference: https://gobot.io/documentation/platforms/arduino/)
Running a robot program in Arduino
The below packages for Arduino platform provide the adaptor for microcontrollers such as Arduino that support the Firmata protocol. The sample program to run is given below:
// testarduino.goimport (
"time"
"github.com/hybridgroup/gobot"
"github.com/hybridgroup/gobot/platforms/firmata"
"github.com/hybridgroup/gobot/platforms/gpio"
)
func main() {
gbot := gobot.NewGobot()
firmataAdaptor := firmata.NewFirmataAdaptor("arduino", "/dev/ttyACM0")
led := gpio.NewLedDriver(firmataAdaptor, "led", "13")
work := func() {
gobot.Every(1*time.Second, func() {
led.Toggle()
})
}
robot := gobot.NewRobot("bot",
[]gobot.Connection{firmataAdaptor},
[]gobot.Device{led},
work,
)
gbot.AddRobot(robot)
gbot.Start()
}
To run the program:
1. Place the above code as "testarduino.go" into a folder e.g
pi@raspberrypi:~/code/golang $ ls testfermata_arduinopi/
testarduino.go
Setup the GOPATH, then run the below commands.
export GOPATH=`pwd`Setup gobot framework
go get -d -u github.com/hybridgroup/gobot/... && go install github.com/hybridgroup/gobot/platforms/firmataRun the go program:
go run testarduino.go
The following terminal cast shows the above step
The output can be watched in the following video where an led on Arduino is blinking

